|
This is something I grew up making. I first learned it from my great grandmother, when I was around 8 or 9 years old. Both my grandmother and my mother made it frequently (albeit slightly differently).
About an hour or two before I plan to make the rice pudding, I put the vanilla beans in a bowl with the sugar and let them sit. Then when I am ready, I split the vanilla beans, scrape out every last bit of the seeds and put them into my milk. (I save the empty pods for another use). Next, I preheat my oven to 325F. I melt the butter on low heat. While my butter is melting, I grease a large soufflé dish and put both my rice and my raisins into the bottom of it. I mixt them around and set it aside. In a large mixing bowl, I beat the eggs, salt and sugar together with a hand mixer. I add the butter slowly, tempering the eggs as I go so that they don’t curdle. Then I add the milk (keeping the mixer going on low) and make sure to scrape every last vanilla seed into the mixture with a spatula. At this point, I have a large roasting pan waiting. I put up a kettle of hot water to boil. I add my custard mixture into the soufflé dish with the rice and raisins and Sprinkle both cinnamon and nutmeg on the top of the custard and mix it all together so the rice blends evenly with the milk and doesn’t sit on the bottom of the pan. I carefully place the soufflé dish into the roasting pan. I put the roasting pan into the middle rack of my oven and add enough boiling water to the roasting pan to make it ½ way up the sides of the soufflé dish (essentially making a bain maire). Be careful not to get water into your custard mixture. The rice pudding will take about an hour or so to cook. You can tell when it’s done when it doesn’t giggle around and is “set.” 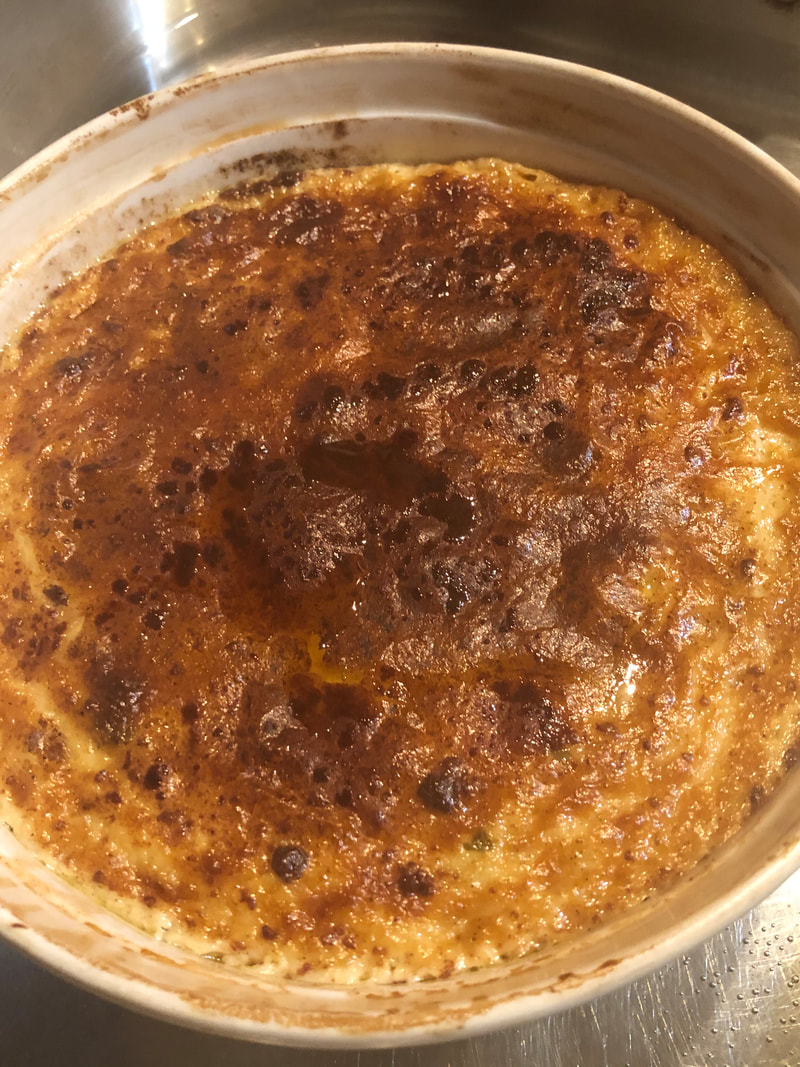
0 Comments
The secret to this soup is the stock. It’s one of the soups I make when I have enough scrap chicken carcasses stored in the freezer to make stock. It’s also one of the few instances where I will use a pressure cooker/InstantPot. Stock:
If I have celery, I will add it as well. The trick is to balance the savory flavors from the mushrooms with the sweet flavors from the carrots and parsnips. I add this to the pressure cooker and cover it with water (to the fill line). I then pressure cook it for 2 ½ hours. It’s important to let it cool enough to de-pressurize on its own, otherwise you will have a very messy kitchen. If you don’t have a pressure cooker, you can make this stock on the stove by adding all the ingredients, filling it with water, and simmering (covered) for six-eight hours. Once my stock is finished, I set up three bowls, one larger than the next. I also grab two mesh strainers that can sit over the bowls and I have a smaller mesh strainer that fits over my storage containers. In the small bowl, I start to add my chicken carcasses and cooked chicken pieces. In the medium sized bowl, I set the strainer up and begin to add my vegetables. I pull out the carrots and parsnip and put it into my blender. Once all the solids have been removed, I press out the remaining liquid from the vegetables through the strainer. Now – the stock is still inside the InstantPot. I discard (or compost) the vegetables and add a little of the strained liquid from the veggies into the blender and puree the carrots and parsnip with it. The result should be a thick paste. At this point, I will set up the big bowl with a clean strainer, line it with cheesecloth (or paper towels) and ladel the soup stock into the bowl. At this point, my stock is strained and in the big bowl, my carrots are pureed and in the blender. I now separate any meat from the bones of the chicken and put them aside for the soup (discarding or composting the bones). I will strain my stock one more time before putting it into storage containers (I put a smaller strainer with cheesecloth over the container). The Soup:
In a large dutch oven, sauté the chorizo on medium heat until it begins to render its fat. Quickly remove it and put it aside. Add the onion to the pan with the chorizo fat and some olive oil. Season the onions with sea salt. Once they start to turn translucent, add the garlic, fresh carrots and parsnip and mushrooms, season again with salt & black pepper and sauté for about 1-2 minutes. Then add the puree. Put the Chorizo back into the pot. Add the can of chickpeas and its liquid, broccoli, the tomato and tomato paste and chicken stock (to about two inches below the edge of the pot). Bring to a simmer and cook until the carrots begin to soften. Stir in the greens and cover the pot off the heat until the greens begin to wilt. Serve with grated parmesan cheese and a piece of crusty bread. As my friends and relatives get older, I am pulled to collect and protect the traditions that were handed down to us for generations before. My grandmother loved chopped liver. Her mother made it often, and it was a staple in their diet. As a kid, my grandmother always had it around, but I never saw her make it. Honestly, I think she cheated and bought it at the Jewish deli, along with her pickled herring (another favorite). My mother didn’t like it, so she never made it. I love it. It’s also really inexpensive to make. You can either save and freeze the livers each time you buy a chicken until you have enough – or you can buy them in the supermarket. I think my local market had 1lb containers for $1 each. My friend Rich makes the best chopped liver I have ever eaten in my life. It’s amazing. His recipe was handed down from his mother, and likely her family before, for generations and generations. This is my adaptation of Rich’s family recipe (I changed some things out of necessity, and some for flavor preference).
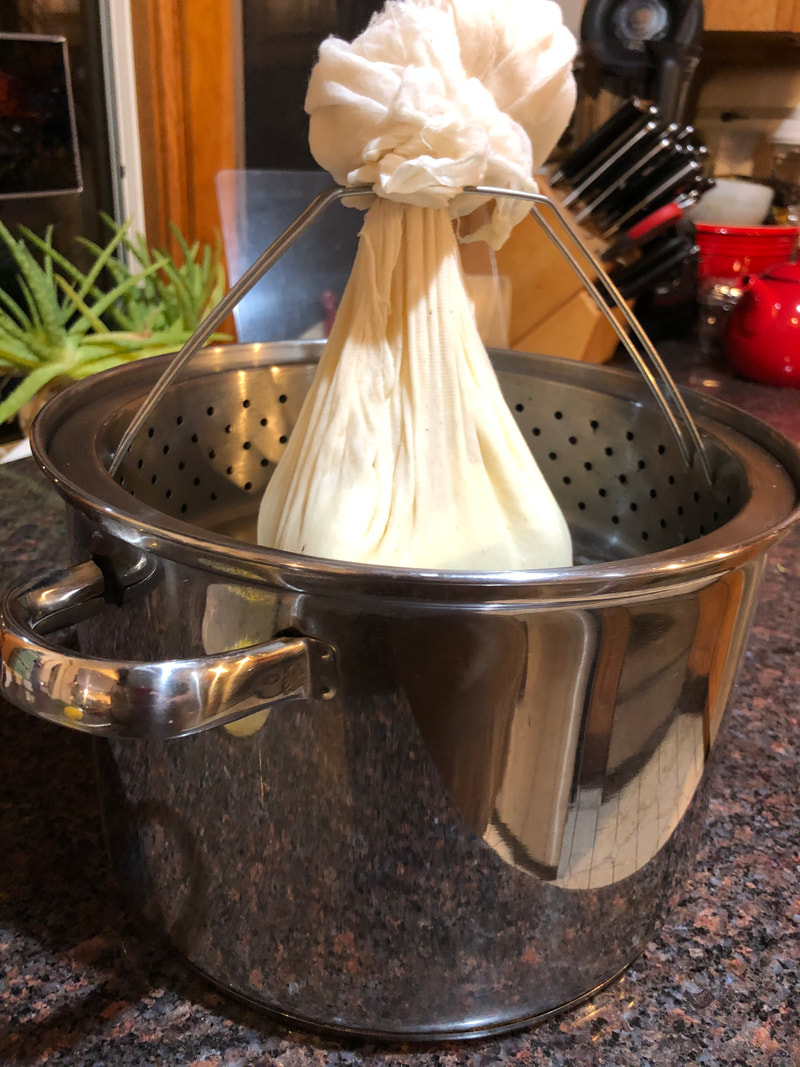
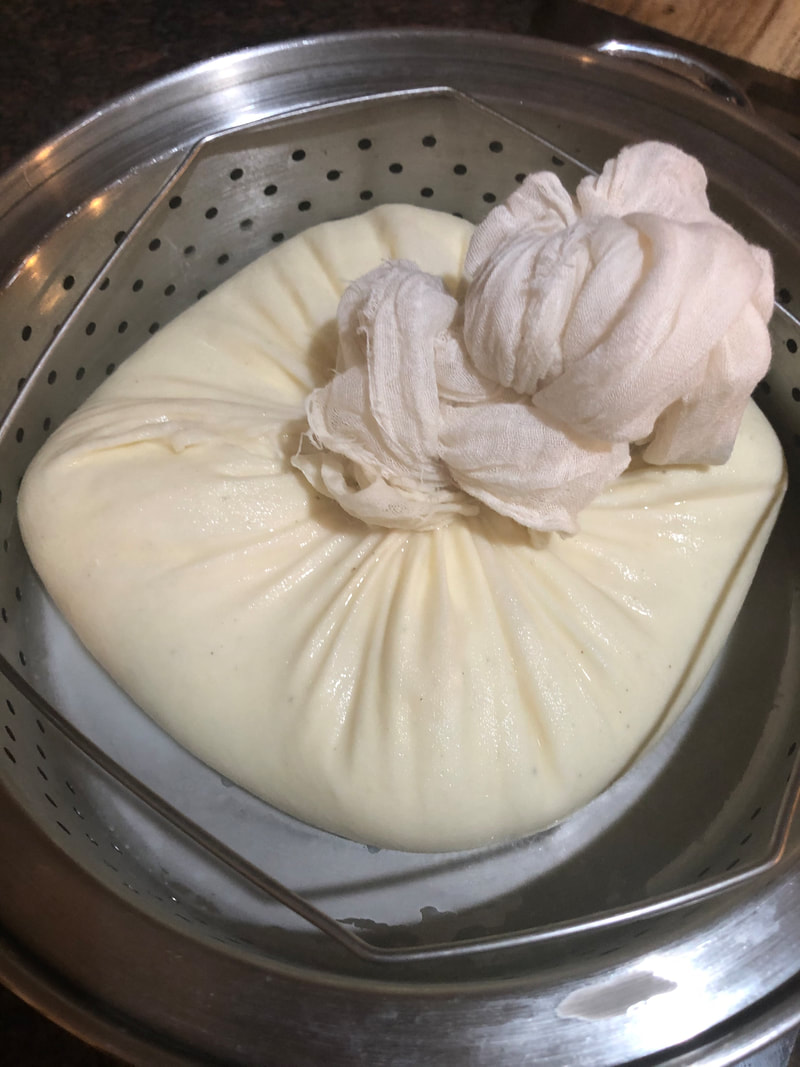
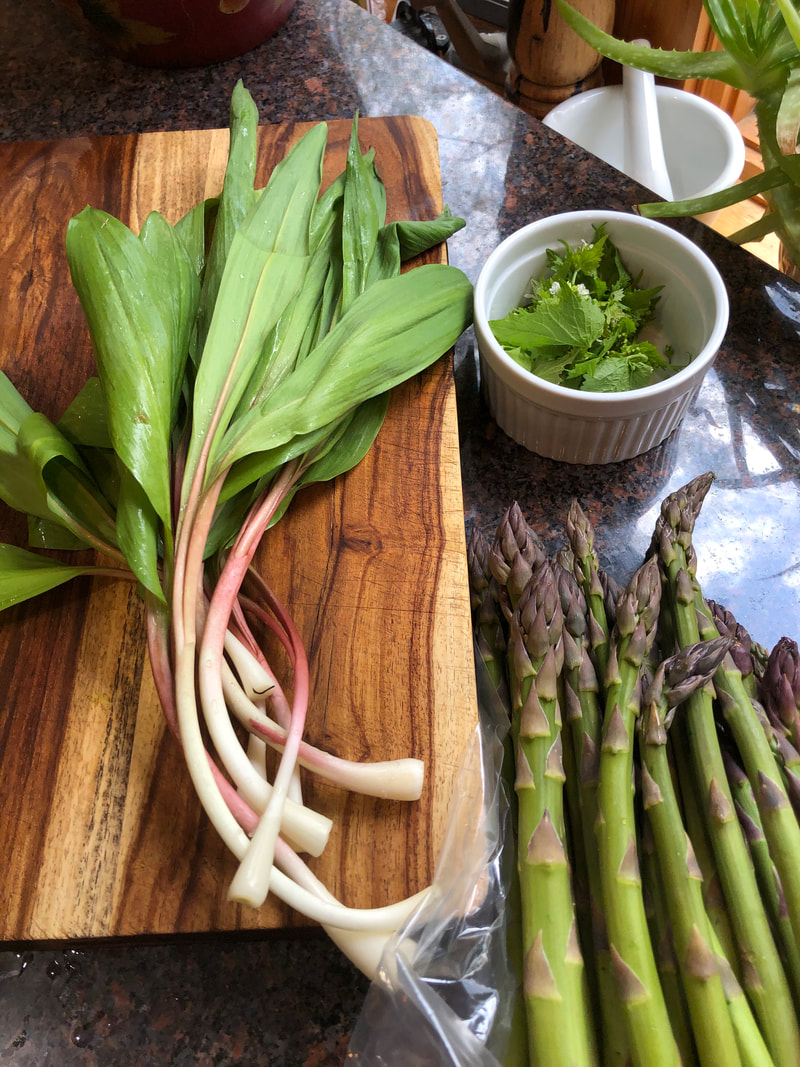
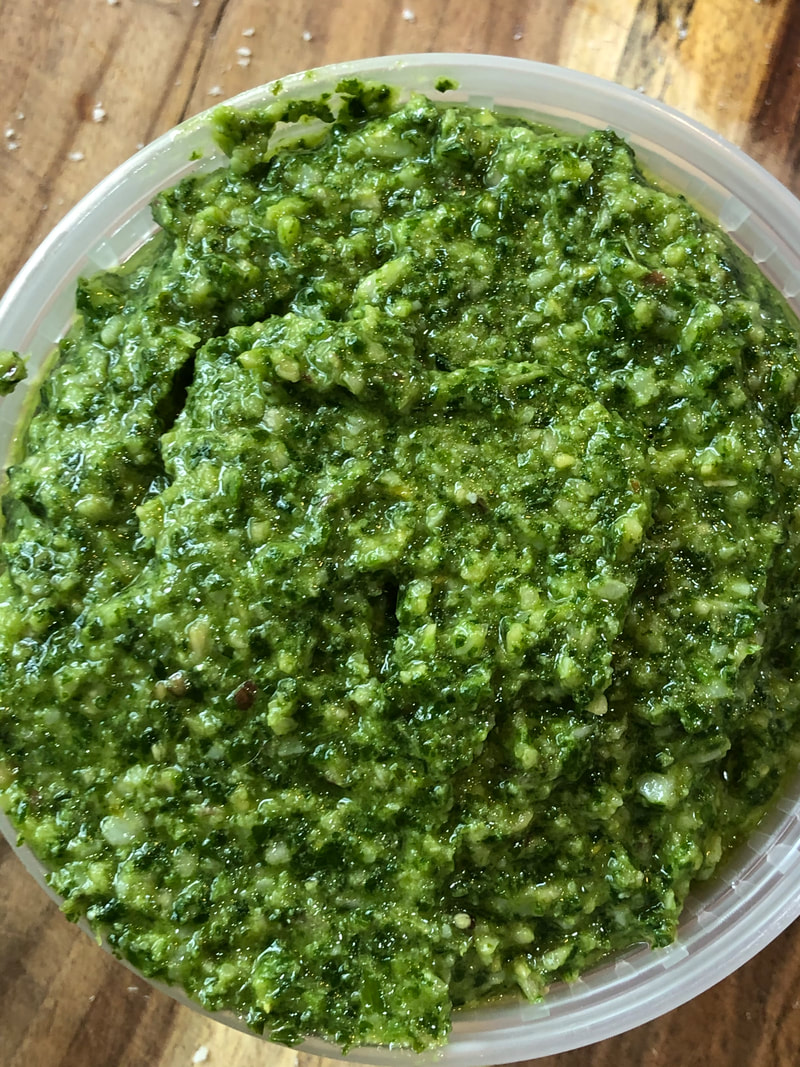
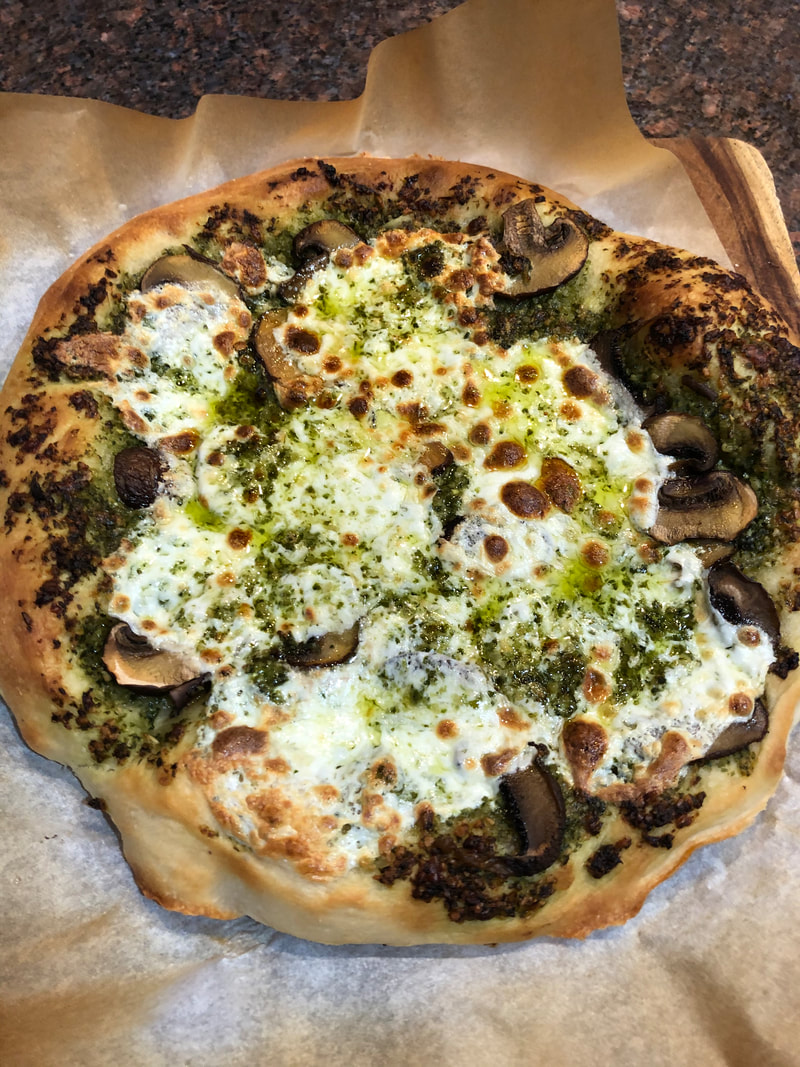
Soak the chicken livers in the buttermilk for an hour, then rinse and dry well with paper towels. Sweat the onion and garlic in the chicken fat and olive oil on low heat so they don’t take on any color – season them with salt and pepper. When the onions become translucent, add the livers to the pan and sauté on low heat. Deglaze the pan with the sherry and let it evaporate. Then add the stock – just enough to come up the sides of the livers without covering them. My friend Rich then puts them in the oven, covered. I braised them on the stovetop but covering the pan with a tight-fitting lid and lowering the heat. When the liquid thickens to almost a jam-like consistency, take it off the heat and let it cool completely. Meanwhile, hard boil your eggs, peel and cool them. You can also either toast your breadcrumbs or get your crackers ready. When both the chicken livers and the eggs are cool, grind them on the coarse setting of the meat grinder. If, like me, you couldn’t remember where you put the grinder – or just don’t have one – you can pulse (very carefully) in the food processor. However, you don’t want paste – so be really careful if using this method. The result – pure deliciousness. 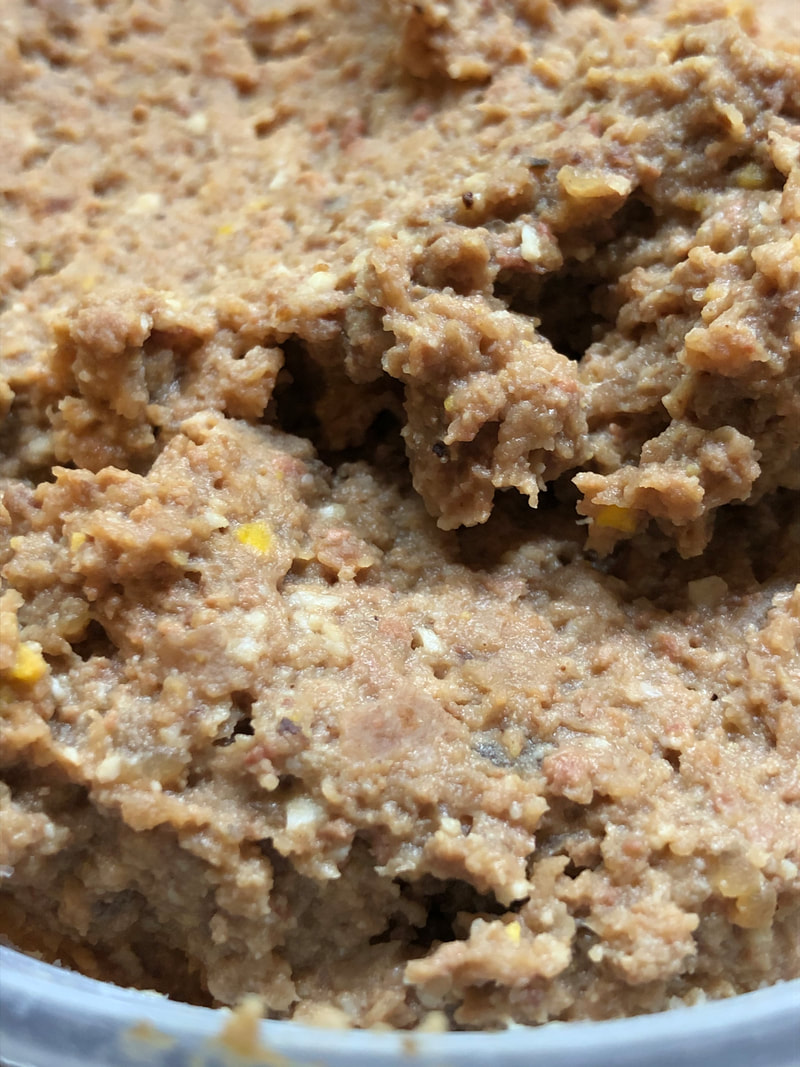 This is one of my favorite salad recipes. It is refreshing and delicious. It begins with beets. Now, I like to cook my beets via Sous Vide, but you can easily wrap them in tin foil with a little salt and pepper and roast them until soft. 3 large beets chopped into a large dice 2 large apples, chopped into a large dice Zest of one lemon Juice of ½ a lemon Approx. 1 tsp olive oil Salt and pepper to taste. 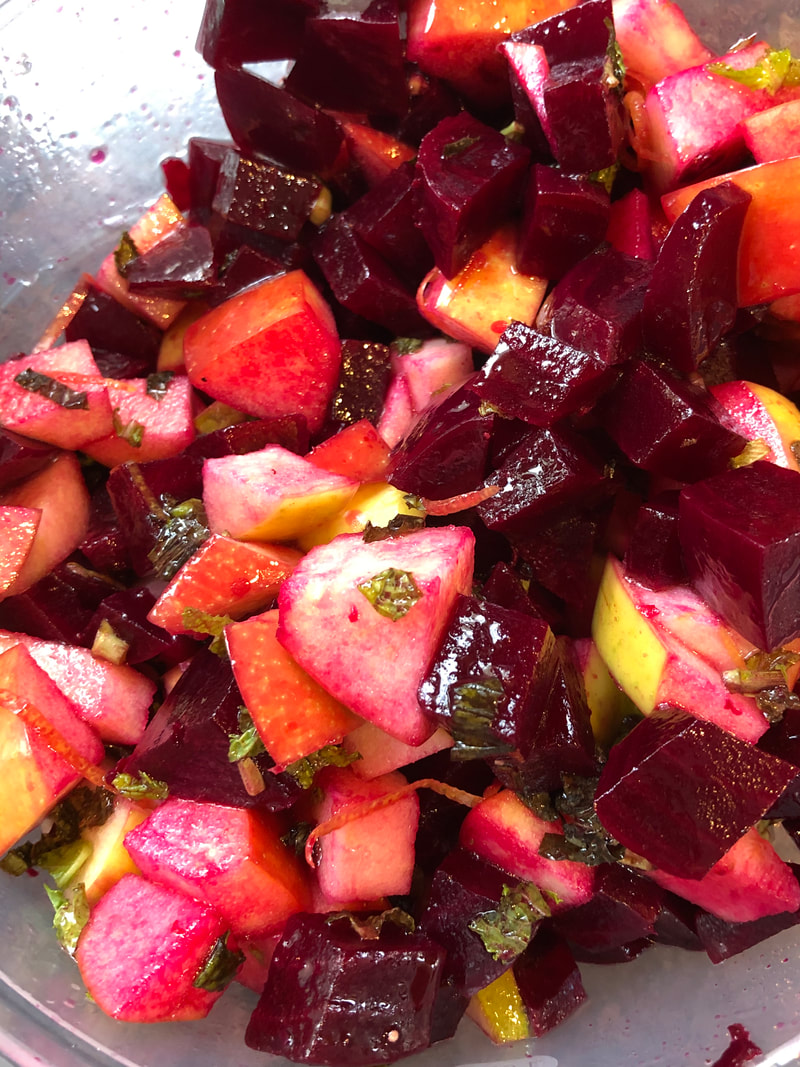 This is such an easy and wonderful thing to make at home. Once you do it, you will never want to buy ricotta cheese ever again. The trick is to heat the milk slowly, and then only add enough lemon juice to curdle the milk. Too much acid will make the curd very firm – and if you want a nice creamy cheese – you have to be careful how much acid you add. Here is what works for me: ½ gallon of non-homogenized milk (no UHT) 1 pint of heavy cream (not UHT, with no additives) 1 lemon 1 tsp of salt Slowly heat your milk and cream to 195F. Stir it constantly and don’t let it boil. When it reaches 195, turn the heat off of the stove, add the salt, and then begin to add the lemon juice. I squeeze a half a lemon at a time and stir consistently until I see it begin to curdle. Stir for about two minutes during the curdling process. Now, I take a stock pot and put a steamer basket on it, which I line with fine cheesecloth. I then begin to ladle the mixture into the cheesecloth so the whey drains out and the cheese remains in the cloth. I tie up the cloth and let it drain for about an hour (longer draining gives you dry curd). Then I put the cheese (yields about a pint) into a storage container in the fridge. I save the whey to make lacto-fermentations, feed my sourdough starter, bake bread, enrich my dogs’ food, etc. Spring offers us an abundance of edible wild greens. I am fortunate enough to live in an area where both garlic mustard and ramps grow abundantly. So, when the garlic mustard begins to flower, I go out and pick a bunch. I pluck off the flowers and use them in salad, then I steam the leaves for only a few moments, to remove some of their bitterness. For the ramps, if I can find them, I snag them on site, but if not, I buy them from the farmer’s market. Two big bunches (about two fistfuls each) of garlic mustard greens Two bunches (about. 12-15 ) of ramps, cleaned and roots trimmed. One bunch of baby spinach (about a fist full) One bunch of Arugula (about a fist full) Half a bunch of basil (half a fist full) One cup of pine nuts One cup of Pecorino Romano cheese (or more to taste) Enough olive oil to make a paste (approx. a cup). First, steam the leaves of the garlic mustard and dry them off. Then combine all ingredients into the food processor and pulse into a paste. Add olive oil as needed to get to the right consistency. Making pizza at home is its own art-form. I grew up in Brooklyn at a time where you really had to work hard to find a bad a bad slice – and some pizza places were truly extraordinary. So I have always had a high standard for pizza. It needs to have a dough that crisps up on the bottom, puffs up beautifully at the crust, but be tender and soft inside. For many years, I considered myself a “pizza purist.” Pizza toppings consisted of quality tomato sauce made with oregano, olive oil, and fresh but mid-to-low moisture Mozzarella. The reason I felt this way was that many pizza places practiced what I would consider 'gilding the lilly.' For me, the essence of a perfect pizza is in its crust. They would load up this poor crust with so many heavy toppings that resulted in a fallen, overly moist and soggy crust. The true pizza artisan knows how to combine simple flavors to accentuate the flavor of the crust. So whether those toppings are tomato sauce and cheese, white sauce and clams, or pesto and mushrooms (for example)– they can result in a fantastic pizza. Now, baking pizza at home can be a challenge. Most people don’t have these magnificent stone pizza ovens designed to generate high heat quickly in their home. A standard home oven is lucky to make it 500 degrees consistently. So, what’s a pizza lover to do?! Well – you need some type of quality heat conductor—Pizza stone, pizza steel (my preference), or even a cast iron skillet (if you are making smaller pies) will work. If you have a charcoal grill, you can get it good and hot – around 800F with a pizza steel on the grates and bake it on there—but watch that you don’t burn yourself of set your hair on fire because it’s quite the inferno before those coals are ready! This yields a beautiful and quickly cooked pie. If your oven can generate at least 500F consistently – then my current favorite method is to preheat a cast iron skillet in that 500F oven for about 45 minutes – around the time your dough is doing its final proof and shape. Then baking the pie inside the cast iron. This has yielded me the most consistent results – and it’s easy! It doesn’t require me to mess around with charcoal, or worry about setting my hair on fire. The cook time is a bit longer – between 10-15 min, but that’s okay. If I wanted to poach an egg on the pie (I sometimes like this), I just have to add it mid-way through the cooking process. Now – on to the dough! The type of flour you use matters. In fact, it matters a lot. I’ve been experimenting with pizza dough for many years now. Here is what I found. A)I actually prefer using commercial yeast to sourdough as it gives me more consistent results. While the sourdough adds a wonderful complexity of flavor, the natural yeasts don’t always survive the long proof times I like to work with. B)Cold fermentation is essential to a quality dough. I like to do all my fermentation in cold storage for pizza. It develops the right blend of flavor, elasticity, and gluten strength for that crispy crust, big crumb and soft texture inside. The perfect dough has been in the fridge between 3-5 days from the time I mix it. C)Flour matters. To get this right, I needed the strength of a high gluten flour, but I wanted the flavor and texture of an AP flour. So, my current mixture uses 50:50 AP and HG. D)Yes, you need both the olive oil and the little bit of sugar in the dough. The results are much tastier with them than without them. Recipe:
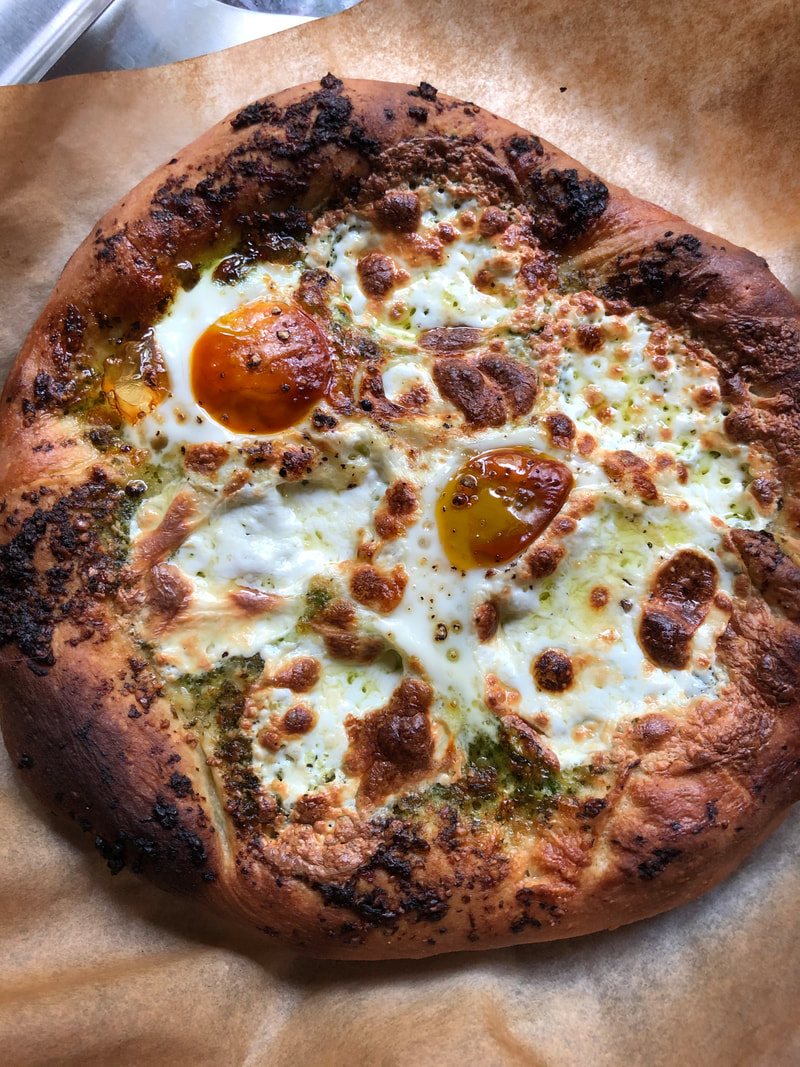
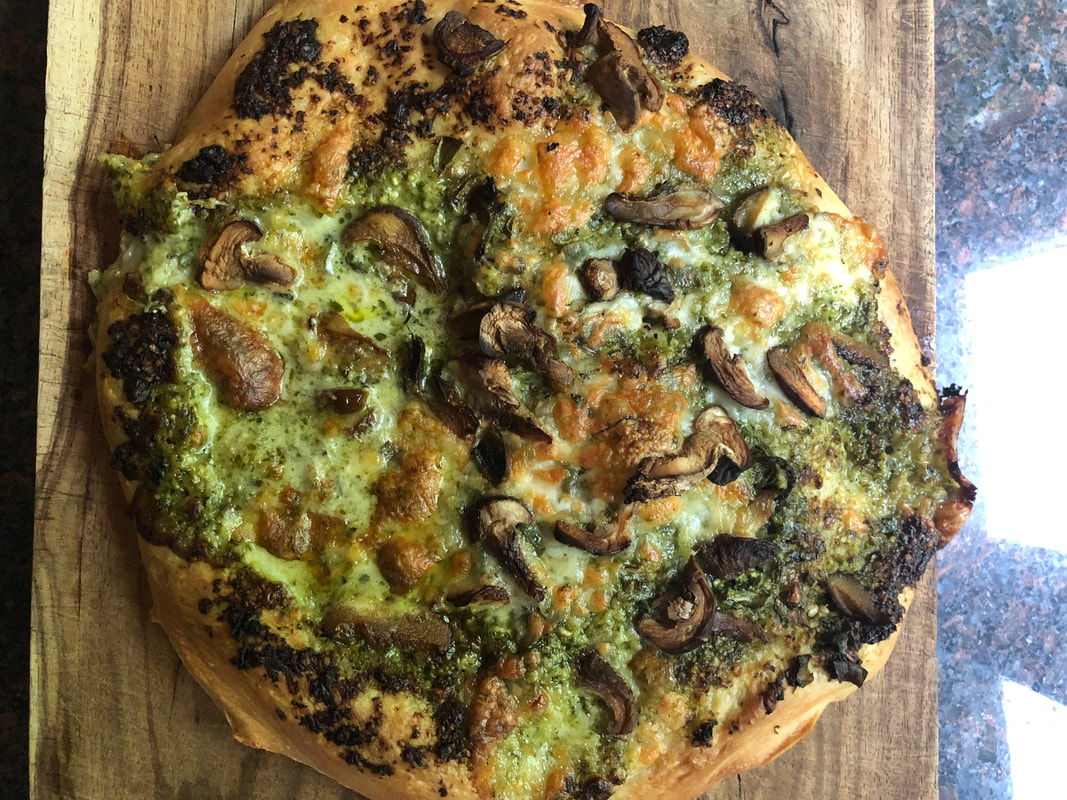
Mixing Dissolve the malt in the water. Combine the flours, yeast, sugar and olive oil in the mixing bowl. I use a kitchenaid mixer. On slow speed with a dough hook, slowly add the water, watching the mixture form into a ball. The dough will be a little sticky but come off of the sides of the bowl (takes about 2 minutes). It will look shaggy. Once it forms a ball, cover it with a towel and leave it for 20 minutes to autolyze. After 20 minutes, add the salt and continue mixing on medium speed for exactly 5 minutes. The First Ferment: Using a dough scraper, pour out the dough onto a work surface and start to stretch and fold. Peter Reinhard does a much better job of explaining what a stretch and fold is than I do, so you can watch him do it here. I usually only need two or three folds before I put it into an oiled (with olive oil) container – large enough for it to expand 2-3x its size—and cover it. At this point, I put my dough in the fridge overnight. Portioning your dough: The next day – I take my dough out of the fridge and divide it. It’s at this point that I have to make some decisions – do I want big pies, or small ones. I usually get 4 cast iron skillet pies from this dough – or three large Pizza Steel pies. I will weigh the total dough and just divide it into 4 equal parts. I stretch and fold each part, and then put them into an oiled ziplock container (each respectively) and put them back into the fridge. I usually wait about 2 days from this point to start baking with them. Then, I have pizza for multiple nights during the week. I find it’s really perfect on day 5. It’s the magic sweet spot. Shaping: When I am getting ready to bake a pie, I take the dough out of the fridge and immediately preheat my oven and my cast iron skillet. I roll the pizza dough into a ball on my counter and cover it with the plastic bag. About 20 minutes later, I take the dough and begin to shape it into a pie. I will start by gently rolling the dough over my knuckles to start to shape it into a round flat dough. When I feel like I have a good enough shape, I then put it on a parchment paper and continue to shape with my fingers. At this point I start preparing my toppings. Toppings: When I think of toppings for pizza, I usually want a sauce, a cheese, and maybe something textural (like a mushroom). A few weeks ago, I made a giant batch of wild greens pesto (see recipe here), and it’s proven to be an amazing sauce for my skillet pies. I am also using fresh mozzarella cheese. I tested low and high moisture cheeses (because the mozz soaked in whey is just soooo good!) and found that a mid-moisture cheese is better for the pizza crust. Too low moisture and the cheese tastes like rubber; too high moisture and you have a soggy crust. Sometimes, I add sliced tomatoes (when I use a pesto base). Other times, I will add sliced mushrooms. I do love adding an egg to my pizza – but I only do that when I can cook it for under six minutes on a steel. The 10-15 minute cook-time of the skillet is just too long for a good egg pizza. I started making this cheese about three weeks ago and I can’t get enough of it. I used it to spread on bagels with some lox, I added it to a French omelet with chives, I eat it as a spread with some honey drizzled on top. It’s got a lovely tang but retains all the probiotics from the yogurt during the cheese making process. Making the cheese itself is easy. However, first you have to make the yogurt! |
DebI'm a home cook with a lifelong passion for learning, exploring and experimenting in my kitchen. You can find me at @Debs1 on Twitter and @Debs121212 on Instagram. Categories
All
Archives
July 2020
|


 RSS Feed
